This article provides an overview of the Minn Kota Fishing App and explains how to use its features to get the most from your integrated Minn Kota fishing system.
Jump To:
- Compatibility with the Minn Kota Fishing App
- Minn Kota Fishing App Download and Install Instructions
- Pairing Devices to the Minn Kota Fishing App
- Minn Kota Fishing App Home Screen and Settings
- Update Software Using the Minn Kota Fishing App
- Map View
- Navigating with the Minn Kota Fishing App
- Importing & Exporting Nav Data
- Trolling Motors Minn Kota Fishing App
- Intelligent Depth Control
- Shallow Water Anchors Using Minn Kota Fishing App
- Map Management
- Self Help
- Minn Kota Fishing App Manual pdf.
Compatibility with the Minn Kota Fishing App
Compatibility
The Minn Kota Integrated Fishing System allows you to connect your Minn Kota and Humminbird Imaging products to create a single network on your boat.
Compatible Trolling Motors
-
Minn Kota Trolling Motors with Advanced GPS Navigation installed
Minn Kota trolling motors obey your every order, from navigating on the water to getting you in and out of it. Enhanced GPS functionality keeps you on the move. Hit Spot-Lock® and your motor will stick you to any fishing spot. Mark it as a waypoint using your fish finder map and you can save that spot for later. The next time you want to return, just select the waypoint and your motor will drive your boat right to it. Models with the Auto Stow/Deploy feature will get your motor in and out of the water for you.
*NOTE: i-Pilot and i-Pilot Link trolling motors are NOT compatible with the Minn Kota Fishing App. -
Bluetooth Talon and Raptor Shallow Water Anchors
When you find a spot, there’s no time to lose. That’s why Talon and Raptor are controllable from anywhere. Use your physical remote, digital remote in the Minn Kota Fishing App, or the interface on your fish finder to control your anchor – no matter where you are.
Compatible Fish Finders
- The Minn Kota Fishing App requires fish finder software version 7.0 and later. You can update software by using Wi-Fi or an SD card. See your operations manual for complete details about updating software. The
- Minn Kota Fishing App is compatible with all X Series, A Series, XPLORE, APEX and SOLIX G3 fish finders.
- Important! A software update may be required, please see the current software version available for your fish finder here.
Shallow Water Anchors
- Raptor
- Bluetooth Talon
Compatible Cannon Products
-
Optimum and Optimum TS
Dive into the depths with confidence, managing up to 4 Cannon Optimum™ downriggers directly from your fish finder display. Easily monitor and adjust downrigger operations and settings through the control head. For enhanced control, compatible fish finders seamlessly connect wirelessly with Cannon Optimum downriggers, providing real-time data from the Fish Hawk Lithium Ultra System and the Fish Hawk X4D System for an elevated fishing experience- NOTE: Cannon Optimum uses Cannon Mobile App and is currently not compatible with the Minn Kota Fishing App. Click here for Installing the Cannon Mobile App on your Android or iPhone
Minn Kota Fishing App Download and Install Instructions
You can download and install the Minn Kota Fishing App on your Android or i-Phone by following the steps below. You can also navigate to the Play Store on Android and the App Store on i-Phone and then searching for "Minn Kota Fishing". To install the app, follow the instructions on your phone.
Android
*Your Android must have software version 9 or newer
-
If you are currently using your phone:
- Tap the link below to Go To the Minn Kota Fishing App in the Google Play Store
- Tap on Install (the app is free to install)
- Once installed, Tap Open
-
If you are not currently using your device:
- On your device, open Google Play Store
- Search for Minn Kota Fishing
- Tap on Minn Kota Fishing app by Johnson Outdoors
- Tap on Install (the app is free to install)
- Once installed, Tap Open
Click here to download the Minn Kota Fishing App for Android
Apple iOS
*Your Apple iOS must have software version 16.6 or newer
-
If you are currently using your phone:
- Tap the link below to Go To the Minn Kota Fishing App in the Apple App Store
- Tap on Install (the app is free to install)
- Once the Minn Kota FishingApp is installed, tap the Open button
-
If you are not currently using your device:
- On your iPhone, open the app in the App Store.
- Search for Minn Kota Fishing
- Tap the Get button (the app is free to install)
- If prompted, enter in your Apple ID to install
- Once the Minn Kota Fishing App is installed, tap the Open button
Click here to download the Minn Kota Fishing App for i-Phone
Note: When you log out of the Minn Kota Fishing App, you will need to log back in using your original email address and password. If you don’t remember your password, you can select “Forgot Password” to reset it.
Create a New Account
If you do not already have a Minn Kota account, you can create an account directly from the Minn Kota Fishing App.
- Tap Create Account from the Minn Kota Fishing App Launch screen.
- Use the on-screen keyboard to type in your account credentials.
- Tap Create Account.
Sign In With an Existing Account
You can sign in to the Minn Kota Fishing App using existing Minn Kota account credentials.
- Tap Sign In from the Minn Kota Fishing App Launch screen.
- Use the on-screen keyboard to type in your email address and password.
- Tap Sign In.
Pairing Devices to the Minn Kota Fishing App
Pairing Fish Finder to the Minn Kota Fishing App
Once you have signed in to the Minn Kota Fishing App, the app will walk you through connecting your mobile device to your Humminbird Imaging and Minn Kota devices. You can choose to skip this step and come back to it later. To return to the Bluetooth Pairing menu, select Self Help from the Home screen and then select Bluetooth Pairing
.
Pair an A Series, X Series, or XPLORE, APEX, or SOLIX to a Mobile Phone.
- On your A Series, X Series, or XPLORE, APEX, or SOLIX press the Home key.
- Select Bluetooth tool. The tool may be called "Network + Devices"
- Under Phone Bluetooth Settings or add devices, select Connect Phone to make your fish finder discoverable by your mobile device.
- Navigate to the Bluetooth Settings on your mobile device.
- Select you fish finder model name under Other Devices (IOS) or Available Devices ( Android)
- When prompted, tap Pair on your phone. Once your fish finder unit is paired with your device, the fish finder model name will display under My Devices in the iOS Bluetooth settings or Paired Devices in the Android Bluetooth settings.
- In your phone settings menu, turn on Show Notifications (iOS only).
Pairing Trolling Motor to Minn Kota Fishing App
Once you have signed in to the Minn Kota Fishing App, the app will walk you through connecting your mobile device to your Minn Kota and Humminbird Imaging devices. You can choose to skip this step and come back to it later. To return to the Bluetooth Pairing menu, select Self Help from the Home screen and then select Bluetooth Pairing
.
Pair an Advanced GPS Trolling Motor to the Minn Kota Fishing App
- On your mobile device, open the Settings menu.
- Select Bluetooth and turn it on (if it is not already on). Keep the Bluetooth menu open while doing the following steps.
- Enable Pairing Mode on the trolling motor:
- Press and hold the Pair button on the trolling motor Control Head.
- The trolling motor will emit a continuous tone while in Pairing Mode.
- Navigate to the Bluetooth Settings on your mobile device.
- Select “Minn Kota Controller 4.0” under the Bluetooth Device List.
- It may take a moment for the trolling motor to appear in the menu. Continue to hold the Pair button during this process.
- The trolling motor will emit 3 beeps when the pairing is successfully completed, and you may release the Pair button.
- If unsuccessful, repeat the process.
Pairing Raptor to the Minn Kota Fishing App
-
Single Raptor
-
Apple iOS
- Enable Pairing Mode on the Raptor by pressing the Pair button on the Raptor. The Raptor will illuminate a blue light to indicate pair mode is active.
- Navigate to the Bluetooth Settings on your mobile device.
- Select BT Raptor under the Other Devices. It may take a moment for the Raptor to appear in the menu. Once your Raptor is paired with your device, BT Raptor will display under My Devices in the iOS Bluetooth settings.
-
Android
- Enable Pairing Mode on the Raptor by pressing the Pair button on the Raptor. The Raptor will illuminate a blue light to indicate pair mode is active.
- Navigate to the Bluetooth Settings on your mobile device. Select the Scan button to begin the search for your device.
- Select BT Raptor under Available devices. It may take a moment for the Raptor to appear in the menu. Once your Raptor is paired with your device, BT Raptor will display under Paired devices in the Android Bluetooth Settings.
-
Apple iOS
-
Dual Raptors
If you are connecting dual Raptors, the Raptors must be paired together before connecting them to your mobile device. Use the following instructions to pair the Raptors together, then follow the instructions for the single Raptor to pair it to your mobile device.
- Place one Raptor in Pairing Mode: Press the Pair button on the Raptor. The blue pair light will illuminate to indicate pair mode is active.
- Place second Raptor in Pairing Mode: Press the Pair button on the second Raptor. The blue pair light will illuminate to indicate pair mode is active.
- Both Raptors will beep three times once they are connected, and then both Raptor mode lights will flash green.
- On the starboard Raptor, press the Up button to set that Raptor as starboard. The starboard Raptor’s mode light will temporarily illuminate green and the port Raptor’s mode light will illuminate red to indicate that the Raptor positions are set.
Pairing Bluetooth Talon to the Minn Kota Fishing App
- Retract the spike on the Talon(s) by pressing the Up
button on the Indicator Panel.
- Enable Bluetooth on the Mobile Device
- Open the Settings menu.
- Select Bluetooth.
- Select On.
- Keep the Bluetooth menu open during the rest of the process. Follow the steps below for pairing to one Talon or Two Talons.
- You may need to turn the Bluetooth off and back on to start the scanning process again.
Pair a Mobile Device to one Bluetooth Talon
-
Apple iOS
- Enable Pairing Mode on the Talon:
Press and hold the Up button and the Down button simultaneously on the Indicator Panel. The Depth Indication LEDs will begin to flash blue. Once the LEDs are flashing, release the buttons on the Indicator Panel. The Talon will go into Pairing Mode for 30 seconds. - On your mobile device, select BT Talon under the Other Devices. It may take a moment for the Talon to appear in the menu. Once your Talon is paired with your device, BT Talon will display under My Devices in the iOS Bluetooth settings.
- Enable Pairing Mode on the Talon:
-
Android
- Enable Pairing Mode on the Talon: Press and hold the Up and Down buttons on the Talon for two seconds. The depth lights will illuminate in a blue pattern to indicate pairing mode is active.
- Navigate to the Bluetooth Settings on your mobile device. Select the Scan button to begin the search for your device.
- On your mobile device, select BT Talon under Available devices. It may take a moment for the Talon to appear in the menu. Once your Talon is paired with your device, BT Talon will display under Paired devices in the Android Bluetooth Settings.
Pair a Mobile Device to two Bluetooth Talons
If you are connecting two Talons, the Talons must be paired together before connecting them to your mobile device. Use the following instructions to pair the Talons together, then follow the instructions above for pairing a Talon to your mobile device.
- Place one Talon in Pairing Mode: Press and hold the Up button and the Down button simultaneously on the Indicator Panel. The Depth Indication LEDs will begin to flash blue. Once the LEDs are flashing, release the buttons on the Indicator Panel. The Talon will go into Pairing Mode for 30 seconds.
- Place second Talon in Pairing Mode: Press and hold the Up and Down buttons on the Talon for two seconds. The depth lights will illuminate in a blue pattern to indicate pairing mode is active.
- Both Talons will beep three times once they are connected, and then both Talon mode lights will flash green.
- On the starboard Talon, press the Up button to set that Talon as starboard. The starboard Talon’s mode light will temporarily illuminate green and the port Talon’s mode light will illuminate red to indicate that the Talon positions are set.
Forgetting a Paired Device
Once a Minn Kota device is paired to your mobile device, it will remember the device, even if they are not actively communicating. In some cases, it may be necessary to clear the memory of the unit on your mobile device.
Apple iOS
- Open the Settings menu.
- Select Bluetooth.
- Select the “i” icon next to the device in the list of My Devices.
- Select the option to Forget This Device.
Google Android
- Open the Settings menu.
- Select Bluetooth.
- Select the Settings icon next to the device in the list of Paired Devices.
- Select the option to Unpair.
Minn Kota Fishing App Home Screen and Settings
Use the Settings menu on the Main Menu to set default units of measurement, disable auto-lock, restore purchases, and send diagnostic information.
- Tap the Settings icon under the Minn Kota Fishing banner at the top right of the app.
- Select one of the following settings to change.
Touch Screen Overview
A summary of the mobile device touch screen actions are shown here.
Update Software Using the Minn Kota Fishing App
Updating Fish Finder using the Minn Kota Fishing App
Note: The mobile device must remain powered on, and the Minn Kota Fishing App must stay open to prevent interruptions during the software update. You can enable the Auto-Lock Disable setting under setting on the Minn Kota Fishing App.
Update Fish Finder Software
- Open the Minn Kota Fishing App on your mobile device.
- Tap Network + Updates.
- Tap Download Update next to the fish finder device you want to update. The download progress is displayed on the screen. You can also tap More Options icon (...) next to the device you want to update, and then tap Download Update. Use this menu to cancel the download (Apple iOS only).
- Tap Transfer Software next to the selected device once the download is complete. You can also tap the More Options icon (...) again, and then tap Transfer Software or Delete Software.
- Confirm the estimated transfer time.
- Tap the radio button to select the transfer location (internal storage, SD card 1, or SD slot 2).
- Tap Start Transfer (Apple iOS) or Transfer (Google Android). The upload progress is displayed under the selected unit in the Minn Kota Fishing App and in the Network + Updates view on the fish finder.
- Follow the on-screen prompts on the fish finder to complete the software installation.
Update Accessory Software
- Open the Minn Kota Fishing App on your mobile device.
- Tap Network + Updates. Transferring Software
- Tap Download Update next to the device you want to update. The download progress is displayed on the screen.
- Tap Transfer Software next to the selected device once the download is complete. The device will power cycle once complete.
Automatically Update Software
You can set you Minn Kota Fishing App to automatically download any new updates when your mobile device is connected to WiFi.
- Open the Minn Kota Fishing App on your mobile device.
- Tap Network + Updates.
- Tap the Settings icon.
- Tap Auto Download On Wi-Fi to turn the feature on/off.
Update Fish Finder Software using Wi-Fi
Once the fish finder is connected to Wi-Fi, you can check for software updates.
- Press the HOME key.
- Select Network + Devices.
- Select the Network + Devices tab.
- Select Check for Updates.
- If an update is available, follow the on-screen prompts to complete the software update.
Updating an Advanced GPS Navigation Trolling Motors using the Minn Kota Fishing App
Update the Advanced GPS Navigation Control Head
- Open the Minn Kota Fishing App on your mobile device.
- Tap Network + Updates.
- Tap Download Update next to the Advanced GPS Trolling Motor. The download progress is displayed on the screen.
- Tap Transfer Software next to the selected device once the download is complete. The motor will power cycle once complete the update.
Update Advanced GPS Wireless Remote Software
- Be sure that the software in the Control Head is updated before updating the Wireless Remote.
- Once the Control Head is up-to-date, press the menu button on the remote.
- Use the Speed Up or Speed Down button to find System. Use the Steer Right button to select System.
- Once in the System menu, use the Speed Up or Speed Down button to find Update Software. Press the Steer Right button to select Update Software.
- If the software is up-to-date, the screen will display "No New Software Found" and will list the current version installed. Press the Steer Right button to cancel.
- If the software is not up-to-date, the display screen will read "New Software Available" and will list the current version installed and the new version that can be installed. Use the Speed Up or Speed Down button to scroll to Update.
- Press the Steer Right button to select Update. Once the software has been downloaded, the display screen will reboot and the Wireless Remote will power up and return to the home screen.
Map View
The Map View App opens to display a map based on your latitude/longitude position, so your current position will be displayed automatically. You can scroll around and zoom in and out of the map to view other locations.
The app provides free access to the Minn Kota basemap and Google Maps. You can purchase a yearly subscription to get access to all US and Canada Minn Kota Maps. See Map Management for more information.
Apple iOS
- Tap Map View from the Home screen.
- Your mobile device will launch a pop-up screen asking if you allow Minn Kota Fishing to use your location. Tap Allow While Using App.
- Before the Map View App home screen will open, tap Agree on the on-screen prompt. The on-screen prompt will display once each time the app is launched.
Google Android
- Tap Map View from the Home screen.
- Tap Agree on the on-screen prompt. The on-screen prompt will display once each time the app is launched.
- The first time you open Map View, your mobile device will launch a pop-up screen asking if you allow Minn Kota Fishing to use your location. Tap Allow While Using App.
Map View Display
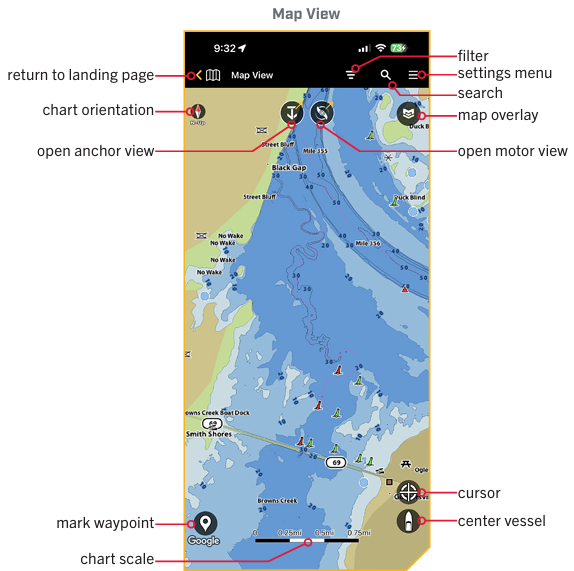
Open the Cursor Bottom Sheet
When the cursor is on and active on the screen, the Cursor bottom sheet is displayed at the bottom of the screen. This displays the distance to the cursor, the bearing and the position of the cursor. Tap the Waypoint icon to mark a waypoint at the cursor position (see Mark Waypoints).
Zoom In and Zoom Out
Tap the Map View icon.
Zoom In: Touch the screen with two fingers and move them apart to zoom in on the map.
OR
Double tap the screen to zoom in.
Zoom Out: Touch the screen with two fingers and bring them closer together to zoom out.
OR
Tap the screen with two fingers.
Change the Map Source
The map source can be changed between the Minn Kota basemap and Google maps. The settings options are reflected by the map source.
- Tap the Map View icon.
- Tap the Minn Kota icon or Google icon to toggle between the two map sources.
OR
- Tap the Map View icon.
- Tap the Menu
icon in the top, right corner.
- Tap Map Source, and select Minn Kota or Google.
Change the Selected Map
Once you have an active subscription, you will need to select the map you want to view. The Basemap will show up for all areas, but you must select the map source to view Minn Kota Maps features. Minn Kota must first be selected as the map source (see Change the Map Source).
- Tap the Map View icon.
- Tap the Menu icon in the top, right corner.
- Scroll down to Map Management, and tap Selected Map.
- Tap the VX map you want to view in the Minn Kota Fishing App.
Set Up Map Setting: Basemap
Use the following instructions to customize the map display when the Basemap is selected.
- Tap Map View.
- Tap the Menu
icon in the top, right corner.
- Tap an individual Map View option to show or hide it. (check mark = visible, blank = hidden)
Set Up Map Settings: VX Maps
Use the following instructions to customize the map display when a VX map is selected. See Subscribe to VX Maps for more information on the VX Chart Subscription service. Additional LakeMaster and CoastMaster settings are discussed in the following sections.
- Tap Map View.
- Tap the Menu
- Scroll to Map Settings and tap General.
- Tap an individual map display option to show or hide it. (check mark = visible, blank = hidden)
Adjust the Map Text and Symbol Size
- Tap Map View.
- Tap the Menu
- Scroll down to Map Setup, and tap Text Size or Symbol Size to make an adjustment.
- Tap Small or Large.
Turn On Night Mode
Night mode darkens the screen for easier viewing at night.
- Tap Map View.
- Tap the Menu
- Tap the toggle to turn on/off night mode.
Set Map Orientation
Set your display preference: North-Up or Head-Up.
- With the Map View displayed tap the Map Orientation Indicator in the top left corner to change the map orientation (Head-up, North-up). OR 1. Tap Map View.
- Tap the Menu
- With a Basemap displayed, under Map Settings, tap Orientation.
- With a VX Map displayed, under Map Settings, tap General, and then tap Orientation.
- Tap Head Up or North Up to select your map orientation.
Adjust the Water Level Offset
It is important to note if the water is higher or lower than usual. For example, if you know the lake is down 4 feet, set the Water Level Offset to -4. The displayed numbers on the Contour Lines will adjust from the Water Level Offset setting, and the water level offset will be highlighted in brown to extend the land visually on the display.
- Tap Map View.
- Tap the Menu
- Scroll down to Map Setup, and tap the Water Level Offset toggle.
- Drag the slider bar to set the water level offset.
- If the water level is higher than normal, set a positive amount.
- If the water level is lower than normal, set a negative amount.
- If the water level has not changed (normal), turn off Water Level Offset.
Select a Preset Map
Use Map Presets to quickly alternate between settings. You can use the default Fishing or Navigation settings provided, or you can create a custom User preset with your preferences. The Fishing and Navigation presets are also fully customizable. You can restore each preset back to its default settings at any time.
- Tap the Map View icon.
- Tap the Menu
- Tap Map Preset.
- Tap Fishing, Navigation or User. The Map Settings will be updated based on the preset selected.
Restore Preset Defaults
You can restore the Fishing and Navigation Preset defaults at any time.
- Tap Map View.
- Tap the Menu
- Under Map Settings, select Restore Preset.
- Tap Confirm if you are sure you want to reset the preset default settings.
Filter Map Objects
Use Map Objects to add or hide map details and navaids on the Map View.
- Tap the Map View icon.
- Tap the Menu
- Under Map Settings, tap Map Objects.
- You can tap one of the following to enable/disable that group of objects:
- Navigation: Shows navaids and labels, light sectors and descriptions, anchorage, caution and routing data, nautical objects, tides and currents, spot soundings, and oil and gas production areas.
- Water: Shows wrecks, rocks, obstructions, natural water features, fishing objects, and the nature of the seabed.
- Land: Shows ports, shoreline objects, roads, points of interest (POIs) and POI labels, and natural land features.
- When a Map Object group is enabled, tap an individual map object to show or hide it. (check mark = visible, blank = hidden)
Show/Hide Spot Soundings
Spot Soundings are depth measurements shown on the map.
- Tap Map View.
- Tap the Menu
- Under Map Settings, tap Map Objects.
- Tap Spot Soundings to show or hide it. (check mark = visible, blank = hidden)
- If Spot Soundings is enabled, tap and drag the Soundings Filter slider to adjust the depth level.
Show/Hide Rocks
- Tap Map View.
- Tap the Menu
- Under Map Settings, tap Map Objects.
- Tap Rocks to show or hide it. (check mark = visible, blank = hidden)
- If Rocks is enabled, tap and drag the Rock Filter slider to adjust the depth level.
Show/Hide Tides and Currents
Turn on Tides and Currents to review information for the nearest tide and current stations to your present position.
- Tap Map View.
- Tap the Menu
- Under Map Settings, tap Map Objects.
- Tap Tides and Currents to show or hide it. (check mark = visible, blank = hidden)
Show/Hide Drying Areas
Tidal drying areas are highlighted on your map by a green and tan hatched pattern. Drying areas can be turned on and off through the Natural Land Features option.
- Tap Map View.
- Tap the Menu
- Under Map Settings, tap Map Objects.
- Tap Natural Features to show or hide it. (check mark = visible, blank = hidden)
Show/Hide Dynamic Tides and Currents
Turn on Dynamic Tides and Currents to display an icon on the Map View that indicates the status of the tides and currents. The provided data is affected by the station’s time zone.
- Tap Map View.
- Tap the Menu
- Under Map Setup, tap Dynamic Tides/Currents to show or hide it. (check mark = visible, blank = hidden)
Adjust Depth Contours
VX maps allow you to show or hide contour lines, highlight a depth range, highlight shallow water set safe depth levels and more.
- Tap the Map View icon.
- Tap the Menu
- Under Map Settings, tap Depth/Contours.
Show/Hide Contour Lines
Show or hide water contour lines in the Map View.
- Tap Map View.
- Tap the Menu
- Under Map Settings, tap Depth/Contours.
- Tap Contour Lines to toggle the contour lines on or off.
Adjust the Contour Density
Use Contour Density to adjust the density of the contour lines displayed on the map. You can set the density to High, Medium or Low. Contour Lines must be on to adjust this feature.
Tap Map View.
- Tap the Menu
- Under Map Settings, tap Depth/Contours.
- Tap Contour Density.
- Tap High, Medium or Low.
Change the Contour Lines Color
Use Contour Color to change the color of the contour lines displayed on the map.
- Tap Map View.
- Tap the Menu
- Under Map Settings, tap Depth/Contours.
- Tap Contour Color.
- Tap the color option of the contour lines.
Change the Contour Source
Customize the contour sources displayed on the map with Fishing and Nautical sources and HD Boundaries (available for select regions).
- Tap Map View.
- Tap the Menu
- Under Map Settings, tap Depth/Contours.
- Tap Depth/Contour Source.
- Tap a contour source to show or hide it. (check mark = visible, blank = hidden)
Display Depth Palette and Adjust the Range and Color
You can adjust the range of data shown on the map by changing the minimum and maximum range on the display. The range you select affects how the depth colors are displayed.
Show/Hide Depth Palette
- Tap Map View.
- Tap the Menu
- Under Map Settings, tap Depth/Contours.
- Tap Depth Palette to toggle the depth palette colors on and off.
Adjust the Palette Range
- Tap Map View.
- Tap the Menu
- Under Map Settings, tap Depth/Contours.
- Find Min Range, and tap and drag the slider to adjust the setting.
- Find Max Range, and tap and drag the slider to adjust the setting.
Change the Color Palette
The Color Palette menu changes the colors used to display the map.
- Tap Map View.
- Tap the Menu
- Under Map Settings, tap Depth/Contours.
- Tap Color Palette and tap the color selection.
- If you have selected a blue color palette, you can adjust the number of shades displayed. Tap and drag the slider to adjust the setting.
Set Depth Highlights
Highlight deep and shallow waters in Map View. Use a Depth Highlight Range to highlight a range on each side of the highlighted depth. For example, if you know a certain fish is holding at 18 to 20 feet, you can set the Depth Highlight at 19 feet, and the Depth Highlight Range at a min/ max range of +/- 1 foot. The view will show a highlighted band in the chosen color from 18 to 20 feet. You can select up to 4 Depth Highlights.
Show/Hide Depth Highlights
- Tap Map View.
- Tap the Menu
- Tap Depth Highlights.
- Tap Depth Highlights to toggle the depth highlights on or off.
Highlight Shallow Water
The Shallow Water Highlight identifies shallow water when the depth is equal to or less than the level you set. For example, if your boat has a draft of 3 feet, set the Shallow Water menu to 3 feet, and the display will draw a red band from 0 to 3 feet. Depth Highlights must be turned on to enable this feature.
- Tap Map View.
- Tap the Menu
- Tap Depth Highlights.
- Tap Shallow Water Highlights to toggle the shallow water highlights on or off.
- Tap and drag the slider to adjust the highlighted depth level.
- Tap Color to select a shallow water highlight color.
Highlight a Depth Range
Depth Highlights allow you to select up to four depth ranges to be highlighted on the map. Depth Highlights must be turned on to enable this feature.
- Tap Map View.
- Tap the Menu
- Tap Depth Highlights.
- Tap Depth Highlight 1 to toggle the depth highlight on or off.
- Under Min Range, tap and drag the slider to adjust the minimum depth range.
- Under Max Range, tap and drag the slider to adjust the maximum depth range.
- Tap Color to select a color for the depth highlight range. 8. Repeat Steps 4-7 for each additional depth highlight (up to four).
Set Safe Depth Levels
Use the Safe Depth feature to set the minimum depth level for your vessel and to turn on highlights for hazards shallower than that level.
- Tap Map View.
- Tap the Menu
- Under Map Setup, tap Safe Depth.
- Tap and drag the slider to adjust the safe depth setting.
- Tap the following Safe Depth Settings to enable/disable them:
- Sounding Highlight: Displays soundings shallower than the safe depth in red.
- Symbol Highlight: Displays hazardous objects shallower than the safe depth with a red outline.
- Always Show Hazards: Forces hazardous objects and spot soundings shallower than the safe depth to display even if the chart object data is hidden. NOTICE: Tap the -/+ icon to preview the map while adjusting the setting.
Change Layers
You can display layers that show aerial imagery (available for Premium lakes and coast), shaded relief or bottom hardness in Map View. The transparency of Shaded Relief and Bottom Hardness is customizable. The source and display area for Aerial Imagery can be changed.
- Tap Map View.
- Tap the Menu icon in the top, right corner.
- Under Map Settings, tap Layers.
- Tap a layer to turn it on or off.
- To adjust the transparency of Shaded Relief or Bottom Hardness, tap and drag the slider to adjust the transparency setting.
Use the instructions in the following section to create waypoints and spot-locks using Minn Kota Fishing app on your mobile device. You can export saved navigation data as .GPX files that can be saved to SD or microSD cards to use on your fish finder. The Minn Kota Fishing App allows up to 10,000 Waypoints or Spot-Locks locations to be saved.
Waypoints and Spot Locks
Use the instructions in the following section to create waypoints and spot-locks using Minn Kota Fishing on your mobile device. You can export saved navigation data as .GPX files that can be saved to SD or microSD cards to use on your Minn Kota fish finder.
Waypoints and spot-locks can be viewed from the Map View, but their data can also be managed from My Data. Instructions in this section will cover how to access features from Map View. See My Data for additional options for managing waypoints and spot-locks.
Mark a Waypoints
See the illustration Marking a Waypoint.
- With a Map displayed on-screen, press and hold the location on the map where you want to mark the waypoint.
OR
- Tap the Waypoint icon at the bottom left corner of the display.
- From the displayed Favorites menu, select a waypoint color and icon.
- Tap All Options to open the Waypoint bottom sheet.
- Tap the X to close the Favorites menu.
Edit Waypoint and Spot-Locks
Edit Favorites
- With a Map displayed on-screen, press and hold the location on the map where you want to mark the waypoint.
OR
- Tap the Waypoint icon at the bottom left corner of the display.
- From the displayed Favorites menu, select the Settings icon in the bottom left corner.
- Tap the Default icon, one of the five Favorite Icons or one of the five Favorite Colors to select a new option from the library.
- Repeat step 3 as needed.
- Tap the X icon to go back to the Waypoint menu.
Edit a Saved Waypoint from the Map View
- With a map displayed on-screen, press and hold the location on the map where you want to mark the waypoint.
- Swipe up on the waypoint bottom sheet.
- Tap a field and make edits. The following data can be edited:
- Name
- Position
- Note
- Group
- Waypoint Label
- Depth
- Avoidance
Edit a Spot-Lock from the Map View
Spot-locks can be viewed and edited from the Map View, but they cannot be created from the Minn Kota Fishing App. Spotlocks must first be imported from the fish finder or a .gpx file. See Importing and Exporting Navigation Data for more information.
- With the Map View on-screen, tap a spot-lock icon.
- Swipe up on the spot-lock bottom sheet.
- Tap a field and make edits. The following data can be edited:
- Name
- Position
- Note
- Group
- Waypoint Label
- Depth
- Avoidance
Move a Waypoint or Spot-Lock
- With the Map displayed on-screen, tap the waypoint or spot-lock icon.
- Swipe up on the bottom sheet.
- Tap Move. The waypoint/spot-lock will display with four arrows and a red circle.
- Tap to a new location on the map.
- When you are satisfied with the new location, tap the Check Mark at the top right of the screen.
- Note: You can only transfer saved Waypoints or Spot-Lock from the Minn Kota Fishing App to A Series, X Series APEX, XPLORE, and SOLIX G3 units. This feature will not work with SOLIX G2, SOLIX G1, or any HELIX models.
Delete a Saved Waypoint or Spot-Lock from the Map View
- With the Map displayed on-screen, tap the waypoint or spot-lock icon.
- Swipe up on the bottom sheet.
- Tap Delete.
Draw to Select
The Draw to Select feature allows you to quickly select multiple waypoints and spot-locks so that you can edit, export, group or delete them all at once.
- Tap Map View.
- Tap the Menu
icon in the top, right corner.
- Tap Draw to Select.
- Use your finger to draw around a group of waypoints and/or spot-locks. The area of selected data points will be highlighted in red.
- Tap a selection from the menu.
Navigating with the Minn Kota Fishing App
Location Services must be enabled on your mobile device for GPS tracking and navigation.
What's in the Navigation Display
When you start navigation, and if you have the Navigation map preset selected, the map orientation icon displays the current setting (North-Up, Head-Up) and the following digital readouts display on the screen
Start Navigation
Use the following instructions to begin navigating to a saved waypoint or spot-lock. Navigate to a Saved Waypoint or Spot-lock from Map View
Navigate to a Saved Waypoint or Spot-lock from Map View
- From the Map View, tap a waypoint or spot-lock.
- Swipe up on the bottom sheet.
- Tap Nav to begin navigation.
Navigate to a Saved Waypoint or Spot-lock from My Data
- Tap the My Data menu
icon from the Main menu, and select Waypoints or Spot-Locks.
- Select the saved waypoint or spot-lock.
- Tap Nav to begin navigation.
End Navigation
Use the following instructions to stop navigating.
- From the Map View, tap the Menu icon
.
- Tap Cancel Navigation.
OR
- From the Map View, tap the waypoint or spot-lock being navigated to.
- Swipe up on the bottom sheet.
- Tap Cancel Nav.
OR
- Tap the My Data menu icon
from the Main menu, and select Waypoints or Spot-Locks.
- Select the waypoint or spot-lock being navigated to.
- Tap Cancel Navigation to cancel navigation.
My Data
Use the instructions in the following section to create and manage waypoints and spot-locks.
Sort Data
- Tap the My Data menu icon from the Main menu.
- Tap Waypoints or Spot-Locks.
- Tap Sort at the top of the screen.
- Select a sorting option: icon type, distance, name, group, and date.
Filter Data
- Tap the My Data menu icon from the Main menu.
- Tap Waypoints or Spot-Locks.
- Tap Filter at the top of the screen.
- Tap the Filter toggle to turn on the filter.
- Tap to turn on/off the Groups filter and the Waypoints filter and select the filter options
Select Data
- Tap the My Data menu icon from the Main menu.
- Tap Waypoints or Spot-Locks.
- Tap Select at the top of the screen and tap on multiple waypoints or spot-locks to select them or tap Select All.
- Once the data is selected, tap one of the options from the menu. This function will apply to all selected data:
- Export
- Group
- Edit Icon
- Edit Color
- Delete
- Select All
- Deselect All
- Invert Selection
-
Add Data
- Tap the My Data menu icon from the Main menu.
- Tap Waypoints or Spot-Locks.
- Tap Add at the top of the screen.
- Add New Data: Enter a latitude and longitude to add
- Tap the My Data menu icon from the Main menu.
Add Group
The My Data group is automatically created as the default group. Use the following instructions to create a new group:
- Tap the My Data menu icon from the Main menu.
- Tap Groups.
- Tap New Group.
- Enter a name for the new group and click save.
Edit a Waypoint or Spot-Lock
-
Tap the My Data menu icon from the Main menu.
- Tap Waypoints or Spot-Locks. 3. Tap the waypoint or spot-lock name to open the Details screen.
- Tap a field change the name, coordinates, add notes, etc. Edits are automatically saved.
- Name
- Position
- Notes
- Group
- Waypoint Label
- Depth
- Avoidance
Delete a Waypoint or Spot-Lock
- Tap the My Data menu icon from the Main menu.
- Tap Waypoints or Spot-Locks.
- Tap the waypoint or spot-lock name to open the Details screen.
- Tap Delete.
OR
- Tap the My Data menu icon from the Main menu.
- Tap Waypoints or Spot-Locks.
- Tap the check box by one or more waypoints/spot-lock. The My Data menu opens at the bottom of the screen.
- Swipe to the right and tap Delete.
Cursor To a Selected Waypoint
- Tap the My Data menu icon from the Main menu.
- Tap Waypoints or Spot-Locks.
- Tap the waypoint or spot-lock name to open the Details screen.
- Tap Cursor To. The waypoint or spot-lock will be displayed on Map View.
Importing & Exporting Nav Data
Use the following instructions to export navigation data (waypoints and spot-locks) using the Minn Kota Fishing App. Navigation data is saved as .GPX files. You can export these files via e-mail, save to your cloud storage, or use an application that is compatible with .GPX files.
Save navigation data to SD or microSD cards to display on your Minn Kota fish finder(s).
Import Nav Data
Import Navigation Data from the Fish Finder
- Press the HOME key.
- Select the My Data tool.
- Select Export All To...
- Select a Save Location: Select to transfer the data to the Minn Kota Fishing App. A message will briefly display to confirm the data transfer.
Import Navigation Data from the App
- Tap the My Data menu icon from the main menu.
- Tap Import Nav Data.
- Select a data file. A message will briefly display to confirm the data transfer.
Export Navigation data from Map View
- With the map displayed on-screen, tap a waypoint or spot-lock.
- Swipe up on the waypoint/spot-lock bottom sheet.
- Tap Export.
- Tap the device you want to send the selected file to.
- Follow the on-screen prompts to export the file. A message will briefly display to confirm the data transfer.
Export Navigation Data from My Data
Export Individual Data Points
Apple iOS
- Tap the My Data menu icon from the main menu.
- Select the type of data you would like to Export: Waypoints or Spot-Locks.
- Tap the selected item. Select Export.
- Tap the device you want to send the selected file to. You can select a connected fish finder or email the .GPX file.
- Follow the on-screen prompts to export the file.
Google Android
- Tap the My Data menu icon from the main menu.
- Select the type of data you would like to Export: Waypoints or Spot-Locks.
- Tap and hold the selected item.
- Tap Transfer to transfer the file to the fish finder. Tap Export to email the .GPX file.
- Follow the on-screen prompts to export the file.
Export All Data
Apple iOS
- Tap the My Data menu icon from the main menu.
- Tap Export All.
- Tap the device you want to send the selected file to. You can select a connected fish finder or email the .GPX file.
- Follow the on-screen prompts to export the file.
Google Android
- Tap the My Data menu icon from the main menu.
- Tap Export All to email all the .GPX files. Tap Transfer to Control Head to transfer all the data files to the fish finder.
- Follow the on-screen prompts to export/transfer the file.
Trolling Motors Minn Kota Fishing App
The Minn Kota Fishing app allows you to operate the trolling motor from your paired mobile device. The trolling motor app is dynamic and will change depending on which motor you have connected.
The following informational data is displayed on the Motor View.
Adjust Boat Scale
Trolling motor performance can be impacted by factors including, but not limited to, wind, water conditions, boat specifications, battery health, wiring, etc. Boat Scale provides a method of adjusting how the trolling motor will perform to account for these and other variables. The Minn Kota trolling motor comes from the factory with Boat Scale set to zero. This can be adjusted either up (+2) or down (-2) to increase or decrease the way the motor control software will apply power while using a navigation mode like Spot-Lock.
An example of needing to reduce Boat Scale would be when the motor is over correcting or making many frequent adjustments while using Spot-Lock. In this case, try reducing Boat Scale -1 to reduce this behavior. If the behavior continues, reduce Boat Scale to -2. The opposite of this would be while using Spot-Lock, the motor is drifting away from its target location frequently or is struggling to make corrections. In this case, try increasing Boat Scale to +1 to help improve the motor’s accuracy. If the behavior continues, increase Boat Scale to +2.
- Tap Motor from the Home screen to access the Motor view.
- Tap the Menu
- In the Motor Settings menu, find and tap Setup and Calibration.
-
In Setup and Calibration, use the slider under Boat Scale to adjust the Boat Scale from -2 to +2.
Set the Stow Orientation
- Tap Motor from the Home screen to access the Motor view.
- Tap the Menu
- In the Motor Settings menu, find and tap Setup and Calibration.
- In Setup and Calibration, find and tap Stow Orientation.
- Tap the radial button for either Prop Right or Prop Left.
Set the Heading Sensor Calibration
This function is only performed on motors with an external Heading Sensor. The process of calibrating the Heading Sensor must occur while your boat is on the water. Heading Sensor Calibration should always be performed after the trolling motor and Heading Sensor have been mounted, but before the Heading Sensor Offset is performed. The Heading Sensor must be connected to power and paired with the Control Head of the trolling motor before beginning this process. The calibration process requires the boat to be driven in two complete circles, so plan accordingly when preparing for this process.
- Power up the trolling motor according to the instructions provided in the Owner’s Manual. Make sure the Heading Sensor is powered up and paired with the trolling motor.
- From the Home Screen, tap Motor to access the Motor view.
- Tap the Menu
- In the Motor Settings menu, find and tap Setup and Calibration.
- In Setup and Calibration, find and tap Calibrate Heading Sensor.
- Review all safety warnings. Tap Start to begin the process.
- Drive the boat in two complete circles. The center of the app screen contains a counter that shows the progress.
- The progress of the boat around the circular path will show as a percentage completed for each circle while the boat navigates.
- Once the two circles are complete, the app screen will read “Calibration Successful. Please perform Sensor Offset.”
- Tap Start Sensor Offset to begin or tap to close the Sensor Calibration and return to the home screen.
Set the Heading Offset
With the Heading Sensor calibrated, set the Heading Offset. Heading Offset is the difference between the angle of the Keel of the boat and the angle at which the Heading Sensor is mounted to the deck of the boat. During installation, the Heading Sensor was installed to be as parallel to the Keel of the boat as possible. If the boat and Heading Sensor are perfectly parallel and pointing in exactly the same direction, the Offset will be a perfect 0° degrees. Knowing that installations are never perfect, the Heading Offset can be set on the Minn Kota Fishing App to compensate for the difference between the two.
- Tap Motor from the Home screen to access the Motor view.
- Tap the Menu
- In the Motor Settings menu, find and tap Setup and Calibration.
- In Setup and Calibration, find and tap Offset Heading Sensor.
- Review all safety warnings. If the placement of the trolling motor is pointing forward and parallel to the keel, tap Set. The degree of Heading Sensor Offset shows at the bottom of the app Display.
- If the trolling motor needs to be adjusted, locate the Return button on the top-left corner of the app screen. Tap the Return button three times until the Motor App home screen displays.
- Use the Steer Right and Steer Left buttons to point the motor forward and parallel to the keel.
- When satisfied with the placement of the trolling motor, locate the Menu
- In the Motor Settings menu, find and tap Setup and Calibration.
- In Setup and Calibration, find and tap Offset Heading Sensor. If the placement of the trolling motor is pointing forward and parallel to the keel, tap Set.
- The degree of Heading Sensor Offset shows at the bottom of the app Display. Tap Return to close the Heading Sensor Offset and return to the home screen.
Set the Keel Mount Offset
The Keel Mount Offset adjusts the position of the motor in relation to the Keel. This function is only performed on QUEST series motors.
- Tap Motor from the Home screen to access the Motor view.
- Tap the Menu icon in the top, right corner to open Motor Settings.
- In the Motor Settings menu, find and tap Setup and Calibration.
- In Setup and Calibration, find and tap Keel Mount Offset.
- Review all safety warnings. If the placement of the trolling motor is pointing forward and parallel to the keel, tap Set. The degree of the Keel Mount Offset shows at the bottom of the app Display.
- If the trolling motor needs to be adjusted, locate the Return button on the top-left corner of the app screen. Tap the Return button three times until the Motor App home screen displays.
- Use the Steer Right and Steer Left buttons to point the motor forward and parallel to the keel.
- When satisfied with the placement of the trolling motor, locate the Menu.
- In the Motor Settings menu, find and tap Setup and Calibration. icon in the top-right corner and tap it.
- In Setup and Calibration, find and tap Keel Mount Offset. If the placement of the trolling motor is pointing forward and parallel to the keel, tap Set.
- The degree of the Keel Mount Offset shows at the bottom of the app Display. Tap Back to close the Keel Mount Offset and return to the home screen.
View Error Codes
If the trolling motor senses an error, it will send a signal to the Minn Kota Fishing App, and a red banner will appear on the display screen. Tap Error Codes in the pop-up menu or use the Error Codes menu in Motor Settings to view the associated Error Code, and then reference the Error Code Table in this manual to resolve the error.
- Tap Motor from the Home screen to access the Motor view.
- Tap the Menu
- In the Motor Settings menu, find and tap Error Codes.
If there is an Error Code, the Error Code will be displayed on the screen. Refer to the table below for a description of the Error Code.
Spot-Lock
Spot-Lock uses a single point as a reference for the spot you want to stay on. The reference point is a set of GPS coordinates that are captured at the location of the motor at the moment the Spot-Lock is saved. This point is recorded and saved into one of the Spot-Lock memory locations. Spot-Lock works by recognizing the GPS coordinates and will automatically navigate the boat to keep it at the Spot-Lock location. If the Advanced GPS Navigation system sees the motor is not positioned at the Spot-Lock location, it will control motor speed and direction in an attempt to keep the motor on the Spot-Lock location.
Mark a Spot-Lock
- Tap Motor from the Home screen to access the Motor view.
- Tap Spot-Lock
-
Tap Save.
Disengage Spot-Lock
- With Spot-Lock engaged, tap Cancel or tap Spot-Lock again.
OR
- With Spot-Lock engaged, tap the Menu
- Tap Nav.
- Tap Cancel Navigation.
Spot-Lock Jog
Spot-Lock Jog allows you to jog the Spot-Lock location 5 feet in the selected direction from the current Spot-Lock location. The Spot-Lock Jog feature is only available with a Heading Sensor.
- With Spot-Lock engaged, tap the Forward, Back, Left, or Right buttons to jog the Spot-Lock location 5 feet in the selected direction. As soon as the boat is jogged to the new location, the new location is immediately saved into a temporary Spot-Lock memory and the boat will relate additional jogging with the temporary Spot-Lock location.
Go To Spot-Lock
- Manually navigate the boat to within a quarter mile of the saved Spot-Lock location.
- Tap the Menu
- Tap Nav, and select Spot-Lock.
- A list of Spot-Locks that are within a quarter mile will appear. Tap the Spot-Lock you want to navigate to. Navigation will start automatically.
AutoPilot
AutoPilot keeps the trolling motor pointed in the direction you want to go. Each time wind or water current moves the boat off course, AutoPilot senses the change and steers itself back to the original heading. The AutoPilot direction is set every time a steering change is made.
Set the AutoPilot Mode There are two different modes of AutoPilot available: Locked Heading and Locked Course. There are distinct differences between the two AutoPilots and how they control your boat. Both AutoPilots have their benefits based on the type of fishing and bait presentation desired. We highly recommend getting on the water and trying both AutoPilot modes in various fishing situations and applications. With experimentation and time, you will find which AutoPilot works best for you in a given situation.
Locked Heading uses an internal compass to provide a heading lock. It keeps the motor pointed in the same compass direction. If a manual steering correction is made, this mode locks onto the new compass heading to which the boat was steered. This method of heading tracking does not take into account external forces, such as side winds or currents, which can allow side drift.
Locked Course not only uses compass heading but also GPS data to correct for cross winds, current and other external forces to keep the boat on the intended course. This mode generates a set of GPS points in a straight track line in the heading direction. When the user steers to a new heading, a new track line of GPS points are laid down in the new heading direction. When very extreme conditions exist, such as strong winds or current, the trolling motor may not have enough power to control the boat smoothly. In these extreme cases, it may be best to use Locked Heading and let the boat move with the wind or current if the motor is not powerful enough to overcome it.
Use the following instructions to change the AutoPilot mode.
- Tap Motor from the Home screen to access the Motor view.
- Tap the Menu
- Tap AutoPilot Mode, and select either Locked Heading or Locked Course.
Engage AutoPilot
- Tap Motor from the Home screen to access the Motor view.
- Tap AutoPilot.
- Tap the Prop to turn the motor on.
- Adjust Heading: To adjust the desired heading, manually steer the motor to a new heading using the Propeller controls or tap Adjust to adjust your course by 5 degree intervals.
AutoPilot Adjust Course - Angle
The angle from the current intended course can be adjusted in 5 degree increments.
- While AutoPilot is engaged, tap Adjust, which is located just below the Course readout.
- The Adjust Course menu will appear at the bottom of the screen. Tap the left or right arrows to adjust the course angle by 5 degree increments.
- The new course will be updated on the Display Screen.
OR
- While AutoPilot is engaged, tap the Menu
- Tap Nav.
- Tap Adjust Course. icon in the top, right corner.
- The Adjust Course menu will appear. Tap the left or right arrows to adjust the course angle by 5 degree increments.
- The new course will be updated on the Display Screen.
AutoPilot Adjust Course - Jog for Locked Course AutoPilot AutoPilot
Jog allows the AutoPilot course to be temporarily adjusted to the left or right. AutoPilot Jog is only available in Locked Course AutoPilot.
- While AutoPilot is engaged, tap Adjust, which is located just below the Course readout.
- The Adjust Course menu will appear at the bottom of the screen with Angle to the left and Jog to the right. Tap the left or right arrows by Jog to adjust the course by 5 foot increments.
Disengage AutoPilot
- While AutoPilot is engaged, tap the AutoPilot button again.
OR
- While AutoPilot is engaged, tap the Cancel button.
OR
- While AutoPilot is engaged, tap the Menu
- Tap Nav.
- Tap Cancel Navigation.
Cruise Control
Cruise Control helps to compensate for the variations in external forces that affect the speed over ground and keeps the boat traveling at an even speed. When Cruise Control is engaged, the current speed over ground becomes the Target Speed. Cruise Control works to control the propeller speed to match the Speed Over Ground to the Target Speed.
Engage Cruise Control
- Tap Motor from the Home screen to access the Motor view.
- Tap Cruise Control.
- Tap Increase Speed or Decrease Speed to adjust the target speed and the Prop speed will adjust accordingly based on current conditions.
Disengage Cruise Control
- While Cruise Control is engaged, tap the Cruise Control button again. The Cruise Control Target Speed will disappear from the screen.
Max Speed
- Tap Motor from the Home screen to access the Motor view.
- While the Prop is engaged, tap and hold Speed Up. The Max Speed icon will display next to the Prop Speed.
Disengage Max Speed
- When Max Speed is engaged, tap Speed Down to disengage. The Max Speed icon will disappear from the display screen.
Drift Mode
Drift Mode combines AutoPilot features with Cruise Control. Engaging drift mode will keep the trolling motor pointed in the direction you want to go, and at the speed you want.
Engage Drift Mode
- Tap Motor from the Home screen to access the Motor view.
- Tap Drift Mode.
- Adjust Heading: To adjust the desired heading, manually steer the motor to a new heading using the Propeller controls. This feature is only available if Dodge mode is turned off.
Adjust Course - Angle
- With Drift Mode engaged, tap Adjust, which is located just below the Course readout.
- The Adjust Course menu will appear at the bottom of the screen. Tap the left or right arrows to adjust the course angle by 5 degree increments.
- The new course will be updated on the Display Screen.
OR
- With Drift Mode engaged, tap the Menu
- Tap Nav.
- Tap Adjust Course.
- Under Angle, tap the Left or Right Arrows to adjust the course by 5-degree increments.
Drift Mode Jog
Drift Mode Jog allows the Drift course to be adjusted to the left or right and still maintain the same course.
- With Drift Mode engaged, tap Adjust, which is located just below the Course readout.
- The Adjust Course menu will appear at the bottom of the screen with Angle to the left and Jog to the right. Tap the left or right arrows by Jog to adjust the course by 5-foot increments.
OR
- With Drift Mode engaged, tap the Menu
- Tap Nav.
- Tap Adjust Course. icon in the top, right corner.
- Under Jog, tap the Left or Right Arrows to adjust the course by 5-foot increments.
Reverse Drift Mode
Reverse Drift Mode allows the user to change target course to the opposite direction of travel.
- With Drift Mode engaged, tap Reverse, which is located just below the Speed readout.
OR
- With Drift Mode engaged, tap the Menu
- Tap Nav.
- Tap Reverse Navigation.
Disengage Drift Mode
- With Drift Mode engaged, tap the Drift Mode button again.
OR
- With Drift Mode engaged, tap the Cancel button.
OR
- With Drift Mode engaged, tap the Menu
- Tap Nav.
- Tap Cancel Navigation.
Record an iTrack
When Record iTrack is turned on, iTrack recording will begin from the current vessel position, and will automatically stop when a 2 mile distance is achieved. The boat must already be moving when iTrack recording is initiated. iTrack is only available with the following modes of navigation: Manual, Cruise Control, and AutoPilot.
Start iTrack Recording
- Tap Motor from the Home screen to access the Motor view.
- Start navigation.
- Tap Record.
Track Recording
- While iTrack is recording, tap Stop.
- Save or Discard: Follow the on-screen prompts to save the iTrack.
Mark a Way Point
Waypoints are saved latitude/longitude positions. They mark a position of interest such as your favorite fishing area, structure or marker buoy. Waypoints work similar to Spot-Locks. When i-Pilot navigates Waypoints, i-Pilot takes control over all steering functions; speed can be manually controlled or the Cruise Control function can also be used. For more information on how to work with Waypoints please see your fish finder manual. Mark a Waypoint
- Tap Motor from the Home screen to access the Motor view.
- Tap Mark. A waypoint is created and saved to the motor contol head.
Circle Mode
Circle Mode uses a compatible fish finder to set a point to navigate around. Once a point is set, the boat can navigate either clockwise or counterclockwise around the set point in a circle. The radius of the circle can be set between 30 to 500 feet. Circle Mode cannot be activated from the Minn Kota Fishing App, but the direction of travel, radius of the circle can be adjusted, and the function can be disengaged using the app. See the fish finder manual to learn more about Circle Mode.
Change the Radius
- While Circle Mode is engaged, tap Adjust, which is located just below the Radius readout.
- The Adjust Radius menu will appear at the bottom of the screen. Tap the left or right arrows to adjust the circle radius by 5-foot increments.
- The new radius will be updated on the Display Screen.
Reverse Direction
- While Circle Mode is engaged, tap Reverse, which is located to the right of the screen.
Disengage Circle Mode
- While Drift Mode is engaged, tap the Cancel button.
Follow the Contour
Follow the Contour allows you to navigate a contour on all Minn Koa Maps LakeMaster, CoastMaster, and AutoChart ZeroLine charts. When starting Follow the Contour, all other types of navigation are stopped on the fish finder and the Ethernet network. The boat can navigate either clockwise or counterclockwise around the contour. The Offset from the contour can range from -300 to +300 feet. Follow the Contour cannot be activated from the OBN App, but the direction of travel, the contour offset, and disengaging the function can be performed using the app. See the fish finder manual manual to learn more about Follow the Contour. If using an AutoChart ZeroLine Map Card, see the AutoChart ZeroLine Map Card Accessory Manual for more information.
Change the Offset
- While Follow the Contour is engaged, tap Adjust, which is located just below the Contour readout.
- The Contour Offset menu will appear at the bottom of the screen. Tap the plus or minus buttons or drag the slider to adjust the offset.
- The new contour will be updated on the Display Screen.
Reverse Direction
- While Follow the Contour is engaged, tap Reverse, which is located to the right of the screen.
Disengage Follow the Contour
- While Follow the Contour is engaged, tap the Cancel button.
Follow the Shoreline
Follow the Shoreline allows you to navigate a shoreline on a Minn Kota Maps LakeMaster or CoastMaster SD card with VX technology. When starting Advanced GPS Navigation to Follow the Shoreline, all other types of navigation are stopped on the fish finder and the Ethernet network. The boat can navigate either clockwise or counterclockwise around the shoreline. The Offset from the shoreline can range from 10 to 300 feet. Follow the Shoreline cannot be activated from the OBN App, but the direction of travel, the shoreline offset, and disengaging the function can be performed using the app. See the fish finder manual to learn more about Follow the Shoreline.
Change the Offset
- While Follow the Shoreline is engaged, tap Adjust, which is located just below the Contour readout.
- The Shoreline Offset menu will appear at the bottom of the screen. Tap the plus or minus buttons or drag the slider to adjust the offset.
- The new contour will be updated on the Display Screen.
Reverse Direction
- While Follow the Shoreline is engaged, tap Reverse, which is located to the right of the screen.
Disengage Follow the Shoreline
- While Follow the Shoreline is engaged, tap the Cancel button.
Deploy or Stow the Trolling Motor
If you have an Ulterra, Ulterra QUEST or RT Instinct QUEST trolling motor installed, you can deploy or stow the motor using the OneBoat Network App.
Deploy the Motor
The first time you deploy the motor (after installation or after defaults have been reset), you will adjust the trim for operation. The motor will save the most-recent trim setting and apply it when the motor is deployed again.
- Tap Motor from the Home screen to access the Motor view.
- Tap Trim/Stow. The Trim/Stow/Deploy box will appear.
- Tap Deploy. Pause: Tap the Pause button.
Adjust the Trim
When trimming the motor using the Minn Kota Fishing app, the motor is programmed to operate safely and limit Prop rotation when it is within certain limits. The Prop will temporarily stop while trimming the motor and resume once trimming is stopped. Trim limits are in place to avoid damage to the unit. An upper trim limit is set 12" from the bottom of the mount to the center of the lower unit. A lower trim is set approximately 1.5" from the bottom of the control head to the trim housing. A Prop lockout region, defined as 14" from the bottom of the mount to the center of the lower unit, is used to eliminate the possibility of the motor contacting the boat hull. All functions, with the exception of manual steer and record iTrack, are canceled upon trimming into this region.
Use the following instructions to adjust the trim.
- Tap Motor from the Home screen to access the Motor view.
- Tap Trim/Stow. The Trim/Stow/Deploy box will appear.
- Tap Trim Up or Trim Down.
Stow the Motor
- Tap Motor from the Home screen to access the Motor view.
- Tap Trim/Stow. The Trim/Stow/Deploy box will appear.
- Tap Stow. Pause:
- Tap the Pause button.
Intelligent Depth Control
Intelligent Depth Control is a feature that detects depth changes, alerts you immediately, and if necessary, automatically engages Spot-Lock® and deploys your shallow water anchors. If you have Intelligent Depth Control set up on your Minn Kota System, you can view the Intelligent Depth Control status and cancel Intelligent Depth Control from the Minn Kota Fishing App. See your fish finder Operations Manual for more information on how to set up Intelligent Depth Control on your Minn Kota System.
Intelligent Depth Control Activation Alert
When Intelligent Depth Control is activated, and red banner will appear on the Motor app.
Cancel Intelligent Depth Control from the App
Manual steering from any device (fish finder, foot pedal, remote control or App) cancels Intelligent Depth Control.
To cancel Intelligent Depth Control from the App, choose one of the following actions:
- Manually steer using the Left or Right arrows.
OR
- Tap the Cancel button.
OR
- Tap the menu, and then select Cancel Navigation.
Shallow Water Anchors Using Minn Kota Fishing App
The Minn Kota Fishing app can be used to control your Minn Kota shallow water anchor. The Anchor Application is dynamic and will change depending on if you are connected to a Talon or Raptor shallow water anchor. You must first select your shallow water anchor source.
- Tap the Settings icon under the Minn Kota Fishing banner at the top right of the app.
- Select Anchor Source.
- Tap the radial button for Talon or Raptor.
Talon
The Minn Kota Fishing App allows you to control and update the Talon from your paired mobile device. For pairing instructions, see Getting Started: Pair the Mobile Device to the Anchor.
App Buttons
Operate Talon from Mobile App:
- Deploy: Double tap the Auto Down button.
- Pause: While the anchor is deploying or retracting, tap the Pause button once.
- Double tap the Auto Down button again to resume deployment, or tap the Auto Up button again to resume retraction.
- Retract: Tap the Auto Up button once.
Talon Settings
Use the following instructions to customize the Talon settings.
- Tap the Menu icon in the top, right corner.
- Select a menu option. Press and drag the slider, or tap the plus (+) or minus (-) signs, to adjust the setting.
Raptor
The Minn Kota Fishing App allows you to operate the Raptor(s) from your paired mobile device. For pairing instructions, see Getting Started: Pair the Mobile Device to the Anchor.
App Buttons
Operate Raptor from the Mobile App
- Deploy: Double tap the Auto Down button.
- Pause: While the anchor is deploying or retracting, tap the Pause button once.
- Tap the Auto Down button again to resume deployment, or tap the Auto Up button again to resume retraction.
- Retract: Tap the Auto Up button once.
Raptor Settings
Use the following instructions to customize the Raptor settings.
- Tap the Menu icon in the top, right corner.
- Select a menu option. Press and drag the slider, or tap the plus (+) or minus (-) signs, to adjust the setting.
Map Management
You can subscribe to VX Charts of USA and Canada directly from your mobile device. A Wi-Fi or cellular data connection is required.
A VX Chart yearly subscription provides online and offline access to Humminbird LakeMaster VX and CoastMaster VX Premium US and Canada cartography. The subscription includes access to the following features:
- The highest detail contour lines available from LakeMaster and CoastMaster charts.
- 10,000+ US and Canadian lakes and complete US coastal coverage.
- Offline access of map data. • Layers including shaded relief, aerial photography and bottom hardness.
- Switch from fishing maps to nautical charts, or create your own custom view settings.
- Plan your fishing day with CoastMaster predictive tide and current data.
- Synchronize depth contours and shorelines of your charts with actual water levels.
- Access a wealth of navigational data such as navigation aids, artificial reefs and points of interest.
- User-defined depth highlight ranges that allow you to easily target productive water and stay in the bite zone.
Subscribe to VX Charts
- Use the instructions in this section to start your VX Charts subscription for the Minn Kota Fishing App.
Tap Map Management from the main menu. - Under the Subscriptions tab, tap VX Charts of USA and Canada. A screen will display reviewing the subscription benefits.
- Tap Subscribe at the bottom of the screen.
- The Apple Store or Google Play Store tab will appear with information on the subscription purchase.
- Tap Subscribe to confirm your purchase. Depending on your mobile device settings, you may be asked to enter your mobile device account password to confirm your purchase.
- A pop-up will display showing that your purchase was successful. Tap OK.
Purchase a Map Card for you Fish Finder
You can also purchase a physical map card to use with your Minn Kota fish finder
- Tap Map Management from the main menu.
- Under the Subscriptions tab, tap Purchase Map Cards. This link will direct you to the Minn Kota Web Site where you can purchase physical map cards.
Remove Your Subscription
If you would like to cancel your subscription to VX Charts of USA and Canada, follow the instructions below.
- Tap Map Management from the main menu.
- Under the Subscriptions tab, tap Manage Subscriptions.
- Follow the on-screen instructions to remove a subscription from your mobile device.
-
Change the Map Source
Once you have an active subscription, you will need to select the map source you want to view:
- LakeMaster VX Premium - U.S. Inland
- LakeMaster VX Premium - Canada Inland
- CoastMaster VX - U.S. Coastal
- CoastMaster VX Premium - Florida Coastal
The Basemap will show up for all areas, but you must select the map source to view Minn Kota Map features.
- Tap the Map View icon.
- Tap the Settings Menu icon in the top, right corner.
- Scroll down to Map Management, and tap Selected Map.
- Tap the LakeMaster or CoastMaster map you want to view in the Minn Kota Fishing App.
Download Maps for Offline Viewing
If you would like to view the maps offline, you can download the basemap or VX maps to your mobile device.
- Tap Map Management from the main menu.
- Tap the Offline Maps tab.
- To download the VX Basemap, tap Download Basemap. The download data bar will display the download progress.
- OR
- To download a LakeMaster or Coastmaster map, select the map type you would like to download, and tap Download Areas to the right of the map type. A tiled Map View will appear on screen.
- OR
- Select either Chart Data or Premium Layers by tapping one of the tabs at the top of the screen. Premium Layers include arial views, shaded relief and bottom hardness, where available.
- On the map, tap the tiles for the areas you would like to download. The Data Bar at the bottom of the screen will show the memory needed for the selected tiles and the free space you have available. You can choose to select all tiles or deselect all tiles. If a tile is outlined in red diagonal hash marks, that means that there is no data available for this area.
- Once downloaded, the selected tiles will be highlighted.
- Tap the Back icon to go back to Offline Maps. You can now view the downloaded areas offline.
Delete Downloaded Maps
Delete All Downloaded Data
- Tap Map Management from the main menu.
- Tap the Offline Maps tab.
- Tap the More Information icon to the right of the map type.
- Tap Delete Offline Data.
- Tap Confirm to delete all offline data related to that map type.
Delete A Downloaded Tile
- Tap Map Management from the main menu.
- Tap the Offline Maps tab.
- Tap Download Area.
- Tap the Trash icon on any downloaded tile you want to delete.
Self Help
You can use the Minn Kota Fishing App to direct you to operation manuals, installation guides, and general reference material that we have available.
- Tap Self Help from the Minn Kota Fishing App Home screen.
-
Tap one of the following options to continue:
Request a Callback
The Minn Kota Fishing App allows you to request a Technical Support callback if you need assistance with your Minn Kota product. This way you can keep fishing and not worry about waiting on hold. In addition, the Callback Request will share a snapshot of your product, so that our Technical Support can help you resolve your issue.
- Tap Request a Callback from the Minn Kota Fishing App Home screen.
- Read the confirmation message and tap Confirm.
- Tap one of the following callback options: • Motors, Anchors and Chargers • Fish Finders, Sonar and Maps
- Review the regular office hours and tap Continue.
- Select the type of product you are calling about, type or scan the serial number and provide a brief description of the problem.
- Tap Request a Callback. A message will appear with the estimated wait time and your reference ID.
- Tap Confirm.
- Tap Request a Callback from the Minn Kota Fishing App Home screen.